
To get a basic installation of Zotero up and running is incredibly straightforward.1 It’s also quite flexible and customizable. So, as you work with Zotero, you can tailor its behavior to how you work, including by adding and customizing extensions.2
If you use Zotero on multiple computers, you can easily synchronize your Zotero library among those machines. But the same isn’t the case for the rest of your Zotero profile—all your settings, styles, and extensions. So, any time you change your profile, you have to make that same change on each machine separately.
0. Be cautious with your local Zotero database.

Inside your Zotero profile folder lives the database that contains the local copy of your Zotero library.3 And Zotero strongly warns against having your database inside a cloud storage folder:
Can I store my Zotero data directory in a cloud storage folder?
No. Storing your Zotero data directory in a cloud storage folder (Dropbox, Google Drive, OneDrive, etc) is extremely likely to corrupt your database and shouldn’t be done.…
“But surely I’ll be fine,” you might think. Many people thought that once. The Zotero Forums contain countless reports over many years of database corruption resulting from the use of cloud storage folders. Sometimes people are able to restore from a backup or recover by using the Zotero Database Repair Tool, but other people lose some or all of their Zotero data. Don’t be one of those people.4
Years ago, I fell victim to this scenario myself. It wasn’t pretty. So, you definitely shouldn’t try to synchronize your Zotero database with a cloud storage provider.
Your Zotero account will synchronize however many items you have in your library. There’s no limit to that. And if you need additional storage for attachments, there are other options for getting that without putting your database in jeopardy.
This said, done carefully, you can synchronize the other parts of your Zotero profile except your database. Once you have the synchronization configured, you shouldn’t have to install or customize extensions or replicate other profile changes on different machines any more.
1. Create a backup.
Your Zotero profile and user data folders will appear in different locations depending on your operating system. Before you begin the process below to synchronize the non-database portions of these folders, however, you should
- back up these folders,
- enable a regular backup schedule with a tool like Macrium Reflect, and
- have that backup run frequently enough so that you’re comfortable with the restoration options it gives you if something goes awry.
Please don’t take these suggestions lightly. I’ve not had any problems with the process I describe here. But having had a Zotero database corrupted years ago, I know what a pain it is to try to put everything together again if, somehow, the database were to get synchronized through a cloud storage provider.
This is where the third bullet particularly comes in. There’s a chance that you might get things set up, and then, at some point down the road, your local database might get synchronized in a way that corrupts it. That’s unlikely, but it’s also not something that can be completely ruled out. So, before you press ahead, it’s prudent to ensure you have your bases covered.
When your comfortable with your ability to roll things back should you have an issue, you can proceed to the next step.
2. Choose a synchronization tool that allows file exclusions.
If you want to synchronize your Zotero profile folder but not the database or certain other contents, you need a synchronization tool that supports exclusions. That is, you need to be able to tell your synchronization tool to ignore some of the contents of its directory.
Dropbox, OneDrive, Syncthing
For this task, I’ve previously used Syncthing with good results. But among major cloud storage providers, both Dropbox and OneDrive also support exclusions.5
The upside of using these services this way is that they’re comparatively straightforward. When running, they also instantly upload changes you make. So, when you close Zotero, your few remaining changes will probably upload and be available from the cloud pretty quickly.
Prerequisites
I haven’t personally tested OneDrive but would welcome comments if you decide to go that route, as well as any other providers where you’re able to do something similar. So, in the comments below, I’ll focus on Dropbox and assume you’ve already
- created a Dropbox account ( affiliate disclosure) and
- installed the desktop application.
Caveats
On the other hand, the upsides of services like Dropbox can also be downsides. For instance, you might accidentally change a setting, only to realize later that change had consequences you don’t like. Or you might delete something only to realize the problem much later.
For such cases, Dropbox and OneDrive do have restoration features. But the restoration process might require you to restore your whole Dropbox or OneDrive just to get your Zotero profile back to an earlier state.
Hopefully, you have another good backup you can use if needed. Picking through backups, however, can make for a difficult and time-consuming restoration process.
An Online Git Repository
Alternatively, you can use a tool like Git. By itself, Git is just a change management system. But Git plays also nicely with online repositories.
GitHub is the most well known host for online Git repositories, but there’s also GitLab and, for end-to-end encrypted repositories that provide more privacy, Keybase.
A fundamental difference between Git and popular cloud storage providers is that Git won’t automatically synchronize changes. Instead, you choose when to create specific snapshots of your work (e.g., just before trying out a change, just before shutting down).
This approach means it might take a bit longer to upload changes once you’re done working. But it also means you can more easily roll changes back to specific points as needed.
Additionally, Git allows you to have a persistent list of ignored files ( .gitignore). So, you any time you configure Zotero on a different machine or reinstall from scratch on the same machine, the files you want to have ignored will already be ignored.
That said, Git hosts typically restrict individual file sizes (e.g., to 100 MB) even if they offer plenty adequate total storage (e.g., 100 GB). So, if you haven’t done so already, you’ll want to relocate your Zotero storage folder if you have or might have any large attachments (e.g., scanned PDFs).
Prerequisites
In the comments below, if you want to use Git, I’ll assume that you’ve already
- created an account with the online Git host of your choice (e.g., GitHub, GitLab, Keybase),
- installed Git, if needed, and
- installed GitFiend.
Caveats
Please note, if you choose Keybase, you’ll also need to install and log into the Keybase client to handle the encryption and decryption of your data as it moves to and from Keybase’s servers.
If Git isn’t already installed on your system (e.g., Windows), the installer can be a bit confusing. But you can just accept the default options (by repeatedly clicking Next) except
- if you use Keybase and the Git installer wants to set a
default branch nameasmain, you need to change this tomasterand - on the
Configuring extra optionspage where you see the option toEnable symbolic links. Be sure this option is checked.
On Windows, you might also need to allow non-administrator accounts to create symlinks. To test whether you do, open a command prompt, and enter mklink /d "%userprofile%\Desktop\Test" "%userprofile%\Desktop". That should create a Test symlink on your desktop that shows your desktop (containing yet another Test) folder. If so, you’re good to go.
If you get prompted for administrator access and you have any symlinks in your Zotero profile (e.g., to another location for your storage folder), you’ll need to allow non-administrator accounts to create symlinks.6 That way, you can download working symlinks from your Git host.
Installing GitFiend isn’t strictly necessary. But it is one of the recommended, cross-platform applications that will give you a nice, graphical interface you can use to save, upload, and download changes.
3. Close Zotero, and configure your folders.
Close Zotero, and before moving on, ensure that you have a usable backup of your folders as discussed above. Once you’re sure you do, configure your folders with your synchronization tool of choice.
Dropbox
To synchronize this folder with Dropbox, just move this profile folder into your Dropbox folder. (For Syncthing, you can synchronize any folder anywhere.)
You can choose to grab profile information at a few different levels of the folder hierarchy. For Windows, the default path is C:\Users\[your username]\AppData\Roaming\Zotero\Zotero\Profiles\[randomstring].[profile name]. What I’ve done is to grab the bolded folder and all its contents and move this folder to %userprofile%\Dropbox\Apps\DesktopApps\Zotero - Roaming - Profiles.
Then, do the same for your user data directory. I’ve moved this folder to %userprofile%\Dropbox\Apps\DesktopApps\Zotero - User Data.
Moving your Zotero profile folder into your Dropbox folder will temporarily upload your local Zotero database files to Dropbox. But that’ll get fixed in a moment.
Git
If you use Git, you don’t need to move your Zotero profile folder, but you do need to prepare your Git host of choice to store your Zotero profile. To do so, create a new, private
- repository in the Keybase desktop client,
- project by opening GitLab in your browser, or
- repository by opening GitHub in your browser.
Name the project or repository something appropriate like Zotero. Doing so will give you a repository URL like
keybase://private/YOURUSERNAME/Zotero,https://gitlab.com/YOURUSERNAME/Zotero.git, orhttps://github.com/YOURUSERNAME/Zotero.git.7
Once you have this project or repository ready, open GitFiend, and click Create. In the Name box, enter the folder name that you want to track and synchronize with Git (e.g., Zotero). In the Location box, enter the path to this folder (e.g., C:\Users\[your username]\AppData\Roaming\Zotero). This way, when GitFiend adds the Name to the end of what’s in the Location box, you’ll have the whole path to your Zotero profile folder (e.g., C:\Users\[your username]\AppData\Roaming\Zotero\Zotero).
Click Create Repo. If you now look in your Zotero profile folder (e.g., C:\Users\[your username]\AppData\Roaming\Zotero\Zotero), you’ll see that GitFiend has added there a .git folder. (You’ll need to have Show hidden files, folders, and drives enabled to see this folder. But it’s there.)
The GitFiend interface should show the number of “changed” files. This number will be equal to the total number of files in your Zotero profile directory since these are, at this point, all “new” to the Git tracking system.
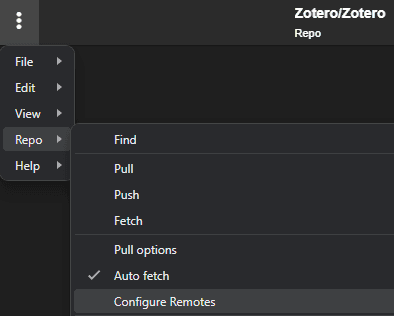
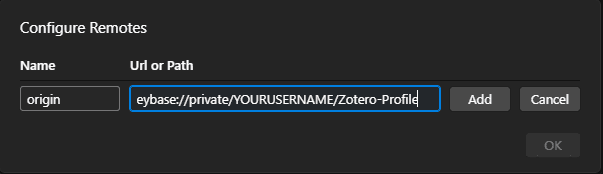
Connect your local repository to your online host by clicking the three dots menu and going to Repo > Configure Remotes. Then,
- click
Add Remote, - paste the URL for your project or repository at your Git host,
- click
Add, and - click
OK.
4. Exclude the files you don’t want to synchronize.
If you use Dropbox, you’ll need to exclude files you don’t want to synchronize once per device. If you use Git, you’ll only need to do it once, and Git will remember those details no matter how many devices you use.
Dropbox
How exactly you tell Dropbox not to synchronize certain contents in your Dropbox folder depends on whether you’re on Linux, Mac, or Windows.8
If you’re on Linux, you must use the command line. But if you’re on Mac or Windows, you have the option to use either the command line or the Dropbox menu.9
4.1. Use the menu.
Before you start excluding files and folders from synchronizing, you may want to open your Zotero - Roaming - Profiles and Zotero - User Data folders (or whatever other names you used for them) open in Dropbox in your web browser. This way, you can see the files disappear as you exclude them to verify that they are, indeed, not synchronizing any more.
4.1.1. Steps to Exclude Files
To exclude files or folders via the menu, you’ll right-click (or command-click) on what you want to exclude. Then, choose the option
Don't sync to Dropbox.com(Windows) orDo Not Sync(Mac).
You’ll need to do this for
- the
parent.lockfile insideZotero - Roaming - Profilesand - each of the
*.sqliteand*.sqlite*bakfiles inZotero - User Data.
After you set this option, you should see each of these files disappear from its respective folder on the Dropbox website. If they don’t, try again, or try to troubleshoot (e.g., by restarting Dropbox or your computer) or use your backup to roll your setup back and try again later.
4.1.2. A Caveat about Excluding Files from the Menu
There is, though, one caveat for this approach. That is, Zotero will sometimes keep multiple previous backups of your database. The most recent one will be zotero.sqlite.bak. Each successively older backup file will have an increasing integer inserted before the extension (e.g., zotero.sqlite.1.bak, zotero.sqlite.2.bak).
When you add exclusions from the Dropbox menu, however, you can only exclude individual files or folders. So, if Zotero adds a further backup beyond what you’ve excluded (e.g., zotero.sqlite.3.bak), that backup will synchronize.
This file will be neither your active database nor its most recent backup, however. So, practically speaking, you shouldn’t be at any meaningful risk of losing or corrupting anything. But this caveat is something to be aware of.
4.2. Use the command line.
If you’re on Mac or Linux, Dropbox provides instructions to get you started with excluding files or folders from the command line.10
4.2.1. Create general variables.
If you’re on Windows, you can open PowerShell, and enter the commands
$dirUser = $env:USERPROFILE$dirDropboxDesktopApps = "$dirUser\Dropbox\[the path to and folder where you've moved your Zotero profile folder]"
So far, these commands just create variables or “nicknames” that you can use in following commands to exclude certain files within your Zotero folders from being synchronized.
$dirUser holds your user profile folder for Windows (e.g., C:\users\[your username]). $dirDropboxDesktopApps builds on this variable and holds the path you’re going to be working with (e.g., C:\users\[your username]\Dropbox\Apps\DesktopApps).
4.2.2. Create replacement symbolic links.
Next, create a symbolic link to the new location for the profiles folder with a command like New-Item -ItemType SymbolicLink -Path "$dirUser\AppData\Roaming\Zotero\Zotero" -Target "$dirDropboxDesktopApps\Zotero - Roaming - Profiles".
Then, do the same for the user data folder with a command like New-Item -ItemType SymbolicLink -Path "$dirUser\Zotero" -Target "$dirDropboxDesktopApps\Zotero - User Data".
At this point, you now have
- your Zotero profile and user data folders inside Dropbox and
- pointers inside the appropriate Zotero application directories to allow Zotero to read from Dropbox as if the files were actually still in their original location.
4.2.3. Exclude files from Dropbox that you don’t want to synchronize.
Before this next step, ensure that
- Dropbox has finished uploading the two Zotero directories you’ve added to it and
- you have your
Zotero - Roaming - ProfilesandZotero - User Datafolders (or whatever other names you used for these folders) open in Dropbox in your web browser.
Having these folders open in your browser will allow you to see exactly what is being synchronized with Dropbox and what, if anything, you’ve successfully excluded. With these folders open in your browser, find particularly
- the
parent.lockfile insideZotero - Roaming - Profilesand - the
*.sqliteand*.sqlite*bakfiles inZotero - User Data.
Then, run the commands
Set-Content -Path "$dirDropboxDesktopApps\Zotero - Roaming - Profiles\Profiles\[your profile folder with the random string]\parent.lock" -Stream com.dropbox.ignored -Value 1. After you run this command, you should seeparent.lockdisappear from the folder as it displays on Dropbox’s website.Set-Content -Path "$dirDropboxDesktopApps\Zotero - User Data\[your profile folder without the random string]\zotero.sqlit*" -Stream com.dropbox.ignored -Value 1. After you run this command, you should see all of the*.sqliteand*.sqlite*bakfiles disappear from the folder as it displays on Dropbox’s website.
If these files don’t disappear as they should, then something has gone awry with the corresponding command. You’ll need to troubleshoot accordingly or use your backup to roll your setup back and try again later.
Git
4.1. Create a .gitignore file.
Open a simple text editor (e.g., Notepad), and create a new file. Into that file, copy and paste
**/cookies.sqlite*
**/parent.lock
**/shader-cache/
User Data/PROFILENAME/storage
zotero.sqlit*
Replace PROFILENAME with your Zotero profile name. If you’re not sure what this profile name is, open a command prompt, type zotero -p, and press Enter. Note the profile name listed in the right-hand box, and click Exit.
If you use the Better BibTex plugin, add another new line to this file with the text better-bibtex.sqlite.
Then, save this file to the folder you’ve added to GitFiend with the name .gitignore. If you can see hidden files and folders, you should then see this file in the same folder as your .git folder.
At this point, you’re ready to load your Zotero profile into your Git host. Doing so takes two steps—saving a snapshot and uploading that snapshot.
4.2. Save a profile snapshot.
In Git’s language, saving a profile snapshot means “making a commit.” To do so through GitFiend, click the Changes button, and write a short note about what changes you’ve made.
Then, click Commit as and however your name displays.
4.3. Upload your profile snapshot.
In Git’s language, uploading a profile snapshot means “pushing a commit” to your Git host. To do so through GitFiend, click the Publish button for your first time.
Whenever you want to save a new snapshot, click Changes to make your commit. Then, click Push to upload that snapshot. (After you click Publish, you’ll see a Push button in the GitFiend toolbar from then on.)
5. Configure your other machines.
If you use Dropbox to synchronize your Zotero profile, you need to add other machines with care so that you don’t inadvertently overwrite parts of your profile. If you use Git, things are a bit more straightforward at this stage.
Dropbox
Once you get the file exclusions configured properly on one machine, you’re ready to configure any others. To do so, for the next machine,
- Ensure you have appropriate backups per step 1 above.
- Double check that Dropbox has finished synchronizing your
Zotero - Roaming - ProfilesandZotero - User Datafolders. - Ensure you have Zotero closed.
- Open PowerShell, and run the commands from step 4.1 above.
- Run the commands from step 4.3 above (yes, skip step 4.2 for now).
- Send your profile and user data folders to the Recycle Bin, or move them from their default locations in some other way.
- Run the commands from step 4.2 above.
- Open Zotero, and allow it to pull your library down from your online Zotero account.
With this ordering of the steps, the idea is that you want to prevent Dropbox on the new machine from synchronizing your database (step 5) before you open Zotero on this machine and it creates those files (step 8).
If this ordering isn’t maintained or one of the commands doesn’t run properly, then your first machine won’t have the new database synchronized to it. That machine already knows not to synchronize those files. So, you shouldn’t have any of the database corruption you’re trying to avoid by not synchronizing the database files with Dropbox.
But the existing, local database on that machine will get deleted, and you’ll need to download your library all over again. If this happens, work back through these steps on the machine where Dropbox has incorrectly uploaded your Zotero database until you have things correctly configured.
Git
To use the same Zotero profile on another machine, ensure Zotero is closed. Then, open the parent folder of the one that you’ve sent to your Git host (e.g., C:\Users\[your username]\AppData\Roaming\Zotero), and delete that folder’s contents.
With GitFiend open, go to the three dots menu, and choose File > Clone Repo…. In the URL or path box, add your Git host’s repository URL (e.g., keybase://private/YOURUSERNAME/Zotero). In the Where to clone to box, add the path where you just deleted the contents (e.g., C:\Users\[your username]\AppData\Roaming\Zotero).
Click clone. It may take a bit, but you should soon see the folder populate with the .git folder and your .gitignore file (assuming you can see hidden files and folders), as well as all the files and folders for your Zotero profile.
When GitFiend indicates it’s done synchronizing, you can open and use Zotero as normal. When you’re done, save and upload a new profile snapshot profile. If you switch back to working from the first machine, open GitFiend, click the Pull button to download your current profile, then open Zotero.
If you forget to upload (push) or download (pull) your current profile, GitFiend might report that you have some conflicting changes. In that case, GitFiend should help you resolve those conflicts.
That said, if things ever get messed up badly, you can delete and reclone your local folder. Doing so, will pull in the same version of your Zotero profile that’s online with your Git host.
Conclusion
If you work with Zotero on multiple machines, you need to determine whether it’s worth configuring your profile information to synchronize across those machines.
You definitely can’t synchronize your Zotero database with a generic cloud storage provider without putting your data in jeopardy.
But if you’re careful to configure things properly, you can synchronize pretty much everything else. And once you have things set properly, you’ll no longer need to take the time to replicate things like setting changes or extension installations across multiple machines.
-
Header image provided by Zotero via Twitter. ↩︎
-
Existing extensions for Zotero 6 do, however, need to be rewritten before they’ll be compatible with Zotero 7. ↩︎
-
Image provided by Kaitlyn Baker. ↩︎
-
“Can I Store My Zotero Data Directory in a Cloud Storage Folder?,” Zotero, n.d.; bold original; see also “Syncing,” Zotero, n.d. ↩︎
-
“How to Set a File or Folder to Be Ignored,” Dropbox, n.d.; Bashkarla, “How to Exclude Specific File Extensions from OneDrive Sync,” WindowsLoop, 12 September 2023. ↩︎
-
Windows 10 or 11 Professional users will already have access to the Group Policy Editor. If you use Windows 10 or 11 Home, you’ll first need to enable this editor. With the editor enabled and open, navigate to
Computer Configuration > Windows Settings > Security Settings > Local Policies > User Rights Assignment. Add a given user account(s) to the list namedCreate symbolic links(e.g., your username or the email address associated with the Microsoft account you used to sign into Windows), and pressCheck Namesto verify that the username has been recognized. Then, pressOK, and reboot your computer to pull the updated permissions onto the user account. If Windows asks you to grant administrator access, go back through the instructions here again, or search online for more current instructions for your version of Windows. ↩︎ -
In these examples,
YOURUSERNAMEwill be the actual username you used when you signed up for your Git hosting service. ↩︎ -
“Set a File or Folder to Be Ignored.” ↩︎
-
This said, if you have a Dropbox team account on Windows, you may experience one or both of these options may be unavailable to you. “Set a File or Folder to Be Ignored.” Shortly after I wrote the original version of this post that noted only the command line option, Dropbox released an update to make exclusions available via the menu as well. I’m grateful to John Duffy, from Union School of Theology, for bringing this update to my attention. ↩︎
-
“Set a File or Folder to Be Ignored.” ↩︎