
Email is everywhere in biblical studies.1 And for all its benefits, it also presents challenges, one of which is security.
Maybe that’s not a big issue for you day-to-day. But there may also be times when it presents a concern. For those times, though, you can send email securely with a few, straightforward steps.
Like having good backups protects your data from being destroyed, sending email securely helps keep sensitive information out of the hands of bad actors. And by making things harder for them, you’re preserving the time you have to work on important projects rather than running the risk that you’ll need to sink hours upon hours into cleaning up after a mess. As the saying goes, “an ounce of prevention is worth a pound of cure.”
0. Understand how secure email works.
Secure email works because of “end-to-end encryption.” That’s a fancy way of saying, essentially, that
- you secure the contents of your email with both a key that only you have (a “private key”) and a key that your intended recipient shares (a “public key”) and
- your intended recipient is able to read your email by combining a key that you share (a “public key”) and a key that only your recipient has (a “private key”).
Together, your “public” and “private” keys are called a “key pair.” When you secure your emails’ contents in this way, those contents become inaccessible to anyone else along the way to their intended recipients (or at least very much more difficult to access along this route).
1. Set up secure email for yourself.
The first step to sending secure email is setting it up for yourself. If you prefer to use webmail platforms directly, you can follow a similar process with the Mailvelope browser extension. But here, I’ll walk through the process with Thunderbird since it’s such a helpful tool for handling email.
To begin, go to Settings > Account Settings.
1.1. Create a key pair.

Under each account for which you want to enable secure email, go to End-To-End Encryption, and choose to Add Key….
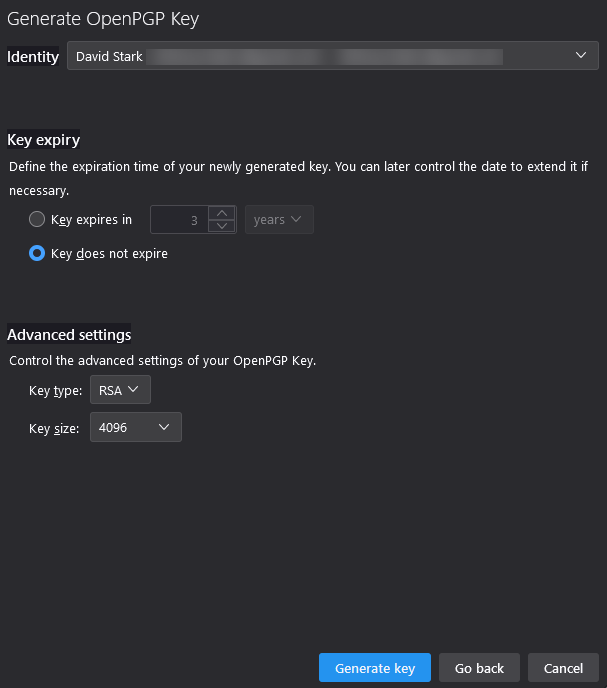
To Create a new OpenPGP Key, click Continue.
If you have multiple identities configured, ensure you see or select the correct one in the Identity dropdown.
If you want to avoid having to hassle with key expiration later, choose Key does not expire. You can always invalidate a key as needed later.2
Under Advanced settings, choose the RSA Key type and 4096 Key size.3
Click Generate key.
You’ll then get a notice that key generation may take several minutes. This alert mainly applies to very old, slower computers. I generated this example key on a 10-year-old machine, and the key was available in under 30 seconds.
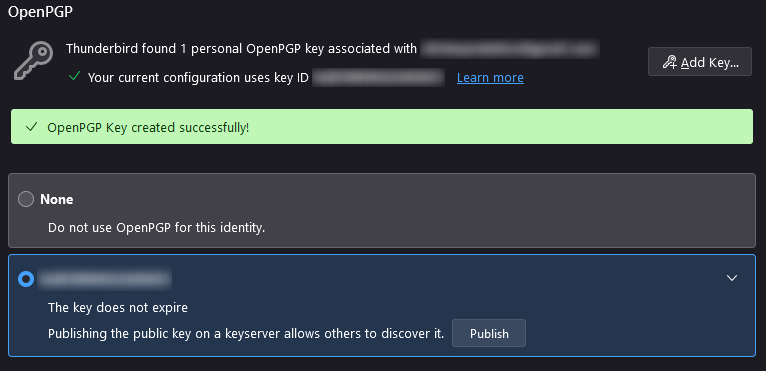
After the key gets created, you’ll see a notice OenPGP Key created successfully!
1.2. Publish your public key.
You’ll also see the key listed. Click Publish to make the public key available online so others can find it and both read secure email from you and send secure email to you.
You’ll then see a notice that Thunderbird sent your public key to vks://keys.openpgp.org.
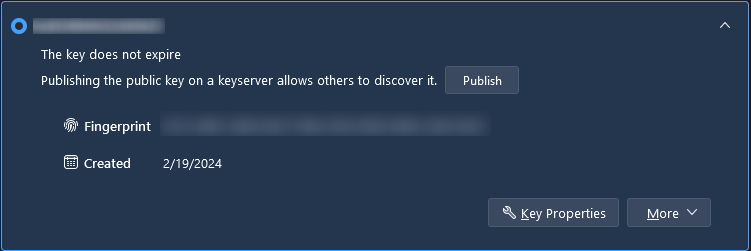
Before you go there, though, close this notice, and expand the information box about the key you just created. Click Key Properties.
Then, in your browser, open https://keys.openpgp.org/. (Note the slight difference here from the URL from the dialog box earlier.)
From this website, in theory, you should be able to search for your own private key by the email address it’s attached to. But I’ve never had much luck with this. Instead, use either the Key ID or Fingerprint showing for your key in Thunderbird. Use this to search OpenPGP.org.
When you do, you’ll get a URL for your public key. To share your public key with anyone, you can share this URL.
2. Back up your keys.
If you were ever to lose your keys, you’d lose access to the contents of any messages secured with those keys. So, you may want to back up your keys to a safe location.
To do so,
- Go to
Settings>Account Settings> any email account >End-To-End Encryption>OpenPGP Key Manager. - Select all the keys listed.
- Go to
File>Export Public Key(s) To File. - Go to
File>Back Up Secret Key(s) To File.
Thunderbird will provide two *.asc files containing all your keys. Save these files in a secure place.
3. Automate secure email.
If you want Thunderbird to automatically secure any email that it can, go to Settings > Privacy & Security > Email End-To-End Encryption > Automatic Use of Encryption.
Check all three boxes. Doing tells Thunderbird you want it to secure whatever email it can and not try to secure any email that it can’t. Or you can always leave these options unchecked and only secure specific emails as needed.
4. Coordinate with your recipients.
After you’ve taken the steps above, there are two more things needed.
4.1. Your Recipient’s Public Key
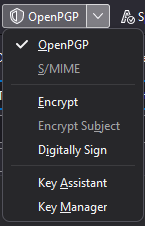
In order to secure email for a particular recipient, you need that recipient’s public key. To find this, type your recipient’s email address into the To field of a new email. Then, go to the OpenPGP menu, and select Key Assistant.
Click Discover Public Keys Online…. If your recipient has already published a public key, Thunderbird will let you know and allow you to import that key.
If not, you’ll need to contact your recipient to ask for his or her public key. When you receive a public key, you can import the key from the Key Assistant or the Key Manager (Settings > Account Settings > any email account > End-To-End Encryption > OpenPGP Key Manager > File > Import Public Key(s) from File).
If necessary, you might also want to link your recipient to this or another similar guide to help him or her through the setup process on that end.
4.2. Your Public Key
In order for your recipient to read your secure email, your recipient needs your public key. If you’ve published your public key, your recipient should be able to find it online but may not know where or how.
To make things easier, you can provide your recipient the URL you got earlier from OpenPGP.org. Or you can send your public key in a regular email explaining the steps you’d like to take to send and receive secure email.
To do so, draft your email as normal. But before you send it, go to the OpenPGP menu again, and choose Digitally Sign. Then, when you send the message, Thunderbird will automatically attach to that message a copy of your public key.
5. Send email securely.
If you want to secure email to multiple recipients in the same message, you’ll need each recipient’s public key, and they’ll need yours. But once you import the keys for your recipient(s), you’re ready to send secure email. And if you have Thunderbird manage securing messages automatically, the process will be really no different for you than it is to send regular, unsecured email.
Conclusion
Secure email might not be something you need often. But Thunderbird now makes the setup process basically a series of mouse clicks and maybe a couple messages to obtain recipients’ public keys.
And like good backups help prevent data loss, secure email can be a useful tool for those times when you need to ensure the contents of your messages don’t fall into mischievous hands. That way, you can keep pressing ahead with important projects rather than getting diverted into spending who knows how long cleaning up after things.
- Header image provided by Abby Anaday. ↩︎
- “Does OpenPGP Key Expiration Add to Security?,” StackExchange, n.d. If you ever need to revoke a key, you can do so from
Settings>Account Settings> any email account >End-To-End Encryption>OpenPGP Key Manager. According to Thunderbird, you would then be provided with a “revocation certificate” that you could “send … to the people you correspond with so that they know that your current key is no longer valid. This ensures that if someone tries to use your current key to impersonate you, the recipients will know that the key pair is not valid.” “Digitally Signing and Encrypting Messages,” Mozilla Support, n.d. You can also delete a key from the OpenPGP Key Manager. But if you do, you’ll lose the ability to read any messages secured with that key. ↩︎ - An RSA-3072 key is less secure than an RSA-4096 key. And while “RSA-4096 keys are slower than ECC Curve25519 keys, … they are secure and offer greater compatibility with legacy software.” “How to Create New Encryption Keys,” Proton, n.d. ↩︎
Leave a Reply